I'm definitely going to make some tofu as soon as I get some cheesecloth, too.i
We still have some commercially produced soy milk left, so I can't really report on the taste yet. But Mike says it's beanier (this does not bother me a bit).
Updates: I've been adding a touch more sugar, and found a way to double-filter the soy milk (using a paper coffee filter after I use the regular (gold) coffee filter) as a way to avoid the very fine and sludgy okara that settles, and that may contribute to the 'beany' or bitter taste. My cereal this morning with milk done this way was fresh and really tasty, much better than cow's milk ever tasted to me. Note: cut sugar a bit, to 1 1/2 T.
Also!! I just made tofu for the first time! I know, enough with the exclamation marks. tough, deal with it. Was it a hassle? Yes, because this first time round I think I used nearly every pot and pan in the kitchen. Even with that, the process was not all that bad - a series of small, easy steps. and it's beautiful (and it's what's for dinner, broiled after marinating simply, with collards and maybe some spiced-up roasted potatoes. More later on the actual taste (details, details).
HOME MADE TOFU
This is a mix of recipes, suited to what I have (I have no nigari, for example - I mean to get some). The basic recipes are from Bryanna Clark Grogan and Just Hungry.
1. 2 or 3 quarts of freshly made soy milk
2. muslin or cheesecloth
3. strainer
4. large pot
Follow the instructions for making soy milk, but instead of putting the strained milk someplace where it can cool down, put into a large pot on the stove on the lowest heat. It should not boil, but just stay hot. If you are using previously made soy milk, heat it up so that it's hot but not boiling. Use a thermometer if you want to be precise - it should be around 75°C / 165°F.
Now add your coagulent. This can be a variety of things. Brianna uses epsom salts; some use nigari, and you can also use lemon juice or vinegar.
For NIGARI
Make your nigari mixture by dissolving 4 teaspoons of powdered nigari in a cup of lukewarm water until the powder is dissolved. (This amount is for the soy milk created from 500g / about 1 lb of dry soy beans, as described in Part 1.) Stirring the warm soy milk, add the nigari liquid in stages, stirring then waiting a bit between additions. As soon as the curd starts to separate from the liquid, stop adding.
For EPSOM SALTS
"For this amount of milk (3 qts), I use two heaping tablespoons of Epsom salts, dissolved in 1/2 cup boiling water. The reason you don't want to add all the nigari at once is because it has a slightly bitter taste, so you want to add a little as possible while still achieving a good degree of coagulation. Most of the time though, the entire amount can be added.
Turn off the heat, and put a tight fitting lid on the pot. Leave for at least 15 minutes, then take a look, stirring very gently to see the state of the curds. They should be fairly big and totally separated from the yellowish liquid. If the white particles are still very small and floating all around in the liquid, add the rest of the nigari liquid if you have some left, or make up an additional teaspoonful's worth of powder and water. Stir in, and put the lid back on for an additional 10-15 minutes." (Bryanna)
for LEMON JUICE or VINEGAR
"*In general, the amount of coagulant is 0.25 to 0.5% of cooked soymilk by weight. Ellen's note: If you don't have calcium coagulant, try to get it, but if you can't, to prepare your solidifier, combine 1 cup warm water with one of the following: 2 tsp. Epsom salts, 2 tsp. nigari, 1/4 cup vinegar or 1/4 cup lemon juice. They take about twice as much volume and need about twice as long as the calcium sulfate.
Cut in 3/4 of the coagulant. Cut gently but persistently in one direction, do not whip or beat. As soon as the curd begins to firm, immediately STOP stirring and cover. Allow the curd to set without disturbing for 10 minutes. If there are any milky patches, shake up the coagulant again and stir in a little more coagulant this way: sprinkle the rest of the solidifier in and poke the top gently and let it sit again for a few minutes. Make sure to stir coagulating tofu gently so as not to break up the curds. It ends up soft white clumps in a yellow whey. If the coagulant is poured in too fast or beaten, the curd breaks apart and won't clump well. Too slowly and it starts coagulating early, creating hard blocks." from Ellen's Kitchen.
Cover the pan and let it sit for around 15-20 minutes. Next, take a sieve and gently ladle out the clear liquid (or as much as possible without disturbing the curds that have now sunk to the bottom of the pan).
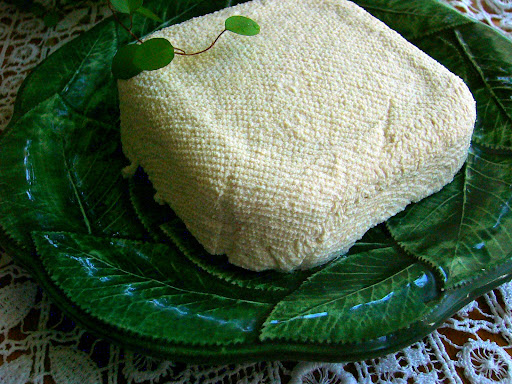
Ladle the curds into a press lined with cheesecloth. I use a cheap grocery store storage box, the kind that comes in packs of 3 or 4, and have drilled holes in it for drainage, and cut the lid so it will fit inside the box.
Wrap the cheesecloth over the top. Put the lid on the top of that, and set a 15 oz can atop all this. Leave it for an hour or so, then (if you want) add more weight to get the tofu firmer.


1 comment:
Well done on your first homemade tofu! I am loving making mine.
I have a soy quick machine that makes enough milk for a good block of tofu - now there just is the matter of all that okara to use up!!!
Post a Comment